Sales
About
The sales functions of OpenERP 7 deals with sales leads coming into the ERP system, identifying opportunities from the leads, the quoting process, and the sales order thereof. A user may also view customers within this area, and create customers. Incoming phone calls which may lead to sales, are also logged within this section, along with scheduled calls to be made by the sales team, which may lead to a sale. A user may schedule a follow up call or meeting based off an incoming call. A user can view current products or create products if he/she has permission for it. A user can also be part of a sales team.
Sub menus
The following screenshot shows the main sub menus under the sales section.
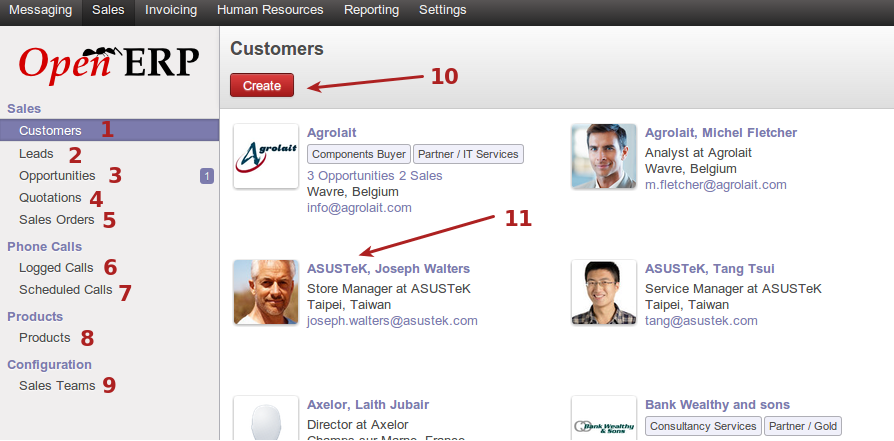
- View, create or edit customers.
- View or manage leads. Leads are mass events which could possibly become opportunities. Leads in openerp are the area for bulk events that could lead to sales, but not each one gets the attention of a sales person due to leads high volume, and comparitively low success rate. Leads which do stand a good chance of making a sale, move on to become an opportunity. So leads are meant as a front-line filter for mass events, to filter out those with better chances of a sale, which move on to become opportunities.
- Opportnities, these have made it past the lead stage, and have a better proposition of getting to a sale. Opportunities have stages that they go through, which are customizable. An opportunity could for example, go through stages of new, qualification, proposition, negotiation, won/lost. Opportunities can get assigned a sales person, and get more personalized attention than leads will. Opportunities eventually go on to the quotations stage.
- Quotations, this allows the sales person to draft up a quotation for the customer. Quotations are similarly formatted to a traditional paper quote, and can be either printed to take to a customer, or emailed to a customer in the standard PDF document format. A quotation can then be confirmed as a sale, after which it then becomes a sales order. Products (discussed later) can be added to quotations, with hourly rates or monetary values, with quanities, which will be used together to calculate the total of the quotation amount.
- Sales orders, these are confirmed sales. An invoice can be generated from these, which enters the account stages to record the sale.
- Logged calls, these are calls taken directly from customers. Logged calls can easily then be converted to opportunities, or used to easily schedule a meeting or a callback for a customer. Logged calls also serve as a record for calls received by customers.
- Scheduled calls are calls that are scheduled to be made to customers. These can also be easily converted to opportunities, and/or meetings scheduled against them. They can also be marked as confirmed or done.
Creating customers
There are two types of customers one can add at this area, a company, or a person. Details to enter will differ between the two, and persons can be added onto a company as a contact.
The following screenshot displays the interface for adding a company as a customer.
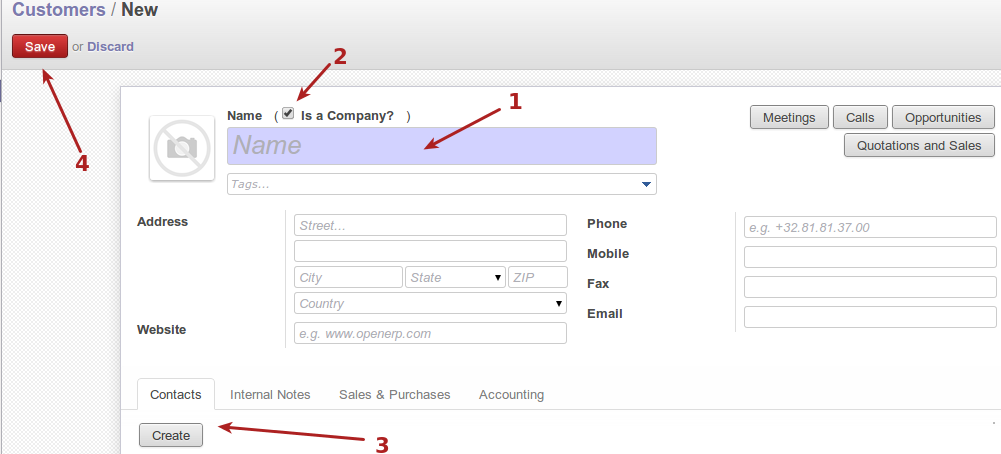
- Customer name, which would be company name if adding a company customer.
- Is a company selection box, tick this if the customer being added is a company.
- Create contact persons under this company customer. These are persons belonging to the company customer.
- Save the company customer.
The following screenshot displays the interface for adding a person customer.
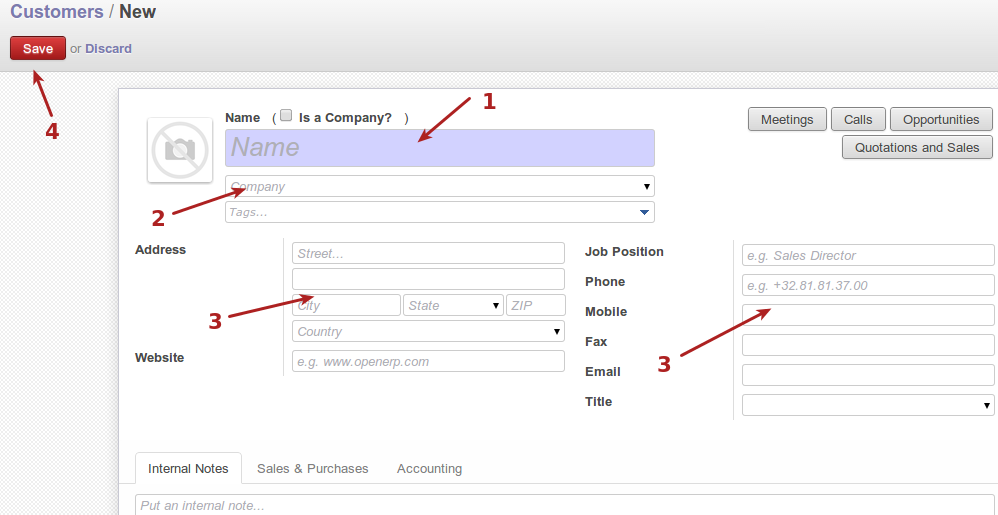
- Customer name, which will be the persons name
- Company under which this person customer belongs. Any previously added companies will be available in the drop down menu to choose from.
- Customers details and contact info
- Save button to confirm the customer.
The following screenshot displays the interface for configuring sales and purchases information for a customer
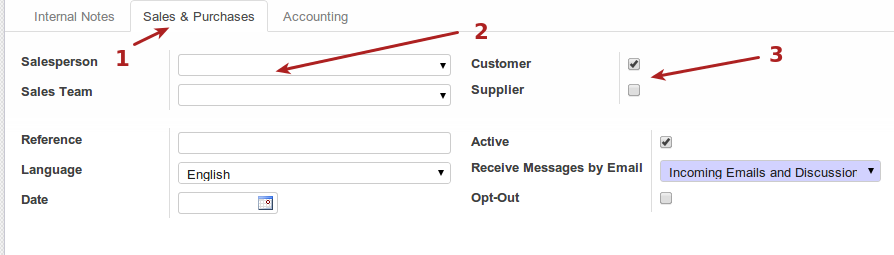
- Sales and purchases tab under the customer or contact, where the information related to these functions are configured
- Sales person or sales team which can be assigned to this customer.
- Customer/Supplier check boxes, these mark this contact as a customer or supplier respectively.
The following screenshot displays the interface for configuring the accounting information for a customer
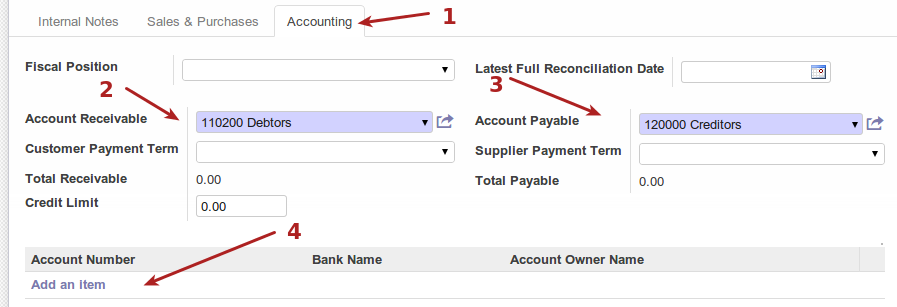
- Accounting tab under the customer or contact, where information regarding accounting for the customer is configured.
- Accounts receivable (to be done)
- Account payable (to be done)
- Bank accounts for the customer (to be done)
Leads
Leads are mass events that could become a sale. Leads in openerp is a net to catch bulk possible sale leads, without dedicating sales staff to every lead. More probable leads become opportunities which get more dedicated attention from sales staff.
The following screenshot displays the interface for some leads entered in the system

- Lead description and details, which can be clicked on to view further details or convert to an opportunity
- Lead state, to reflect how possible this might become a sale.
This screenshot displays the interface for an open lead, which can be edited or converted to an opportunity.
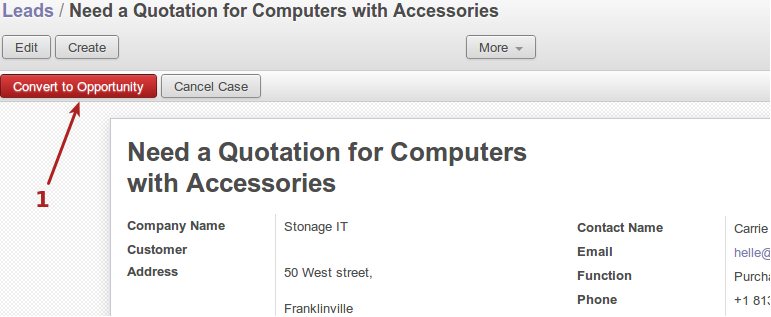
- Convert this lead to an opportunity
Opportunities
Opportunities are events with higher changes of becoming a sale than leads, and can therefore be assigned a sales person or sales team. Opportunities go through phases, which untimately become a quotation.
The following screenshot displays the opportunity listings. These can be moved to different stages by drag and drop of the cards.
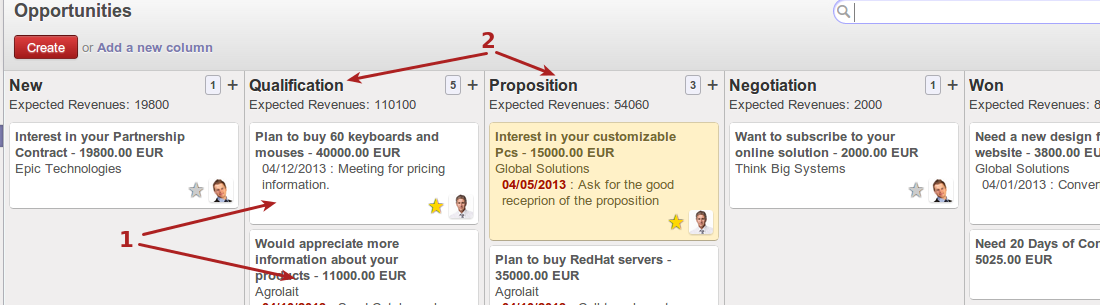
- Opportunity represented as a card, which can be dragged and dropped to another stage.
- Stages that opportunities go through. These can be customized to organization defined stages.
This following screenshot displays an open opportunity. These can be edited to assign sales persons to, or converted to quotations, etc.
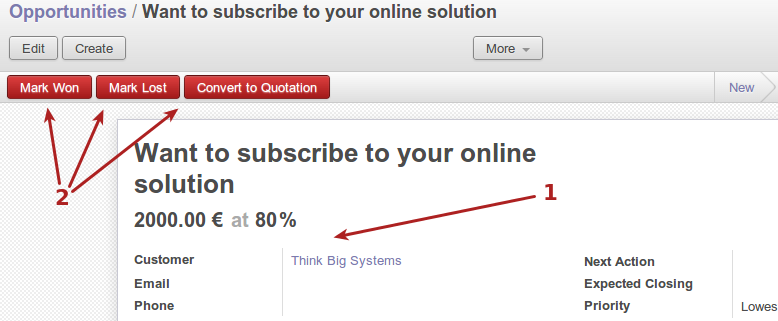
- Opportunity details, including sales person and/or sales team
- Marking opportunity as won or lost, or convert to quotation stage
Quotations
Quotations are drafted similar to paper based layout, and can be printed or emailed to customers. Once sent, the sale can be confirmed, after which the quotation moves on to the sales order stage, and becomes a sales order.
The following screenshot displays the interface listing quotations.

- Quotation summary in list view, which can be clicked and opened for details
- Quote status, which can be draft or quote sent out, etc
The following screenshot displays the interface for an open quote.
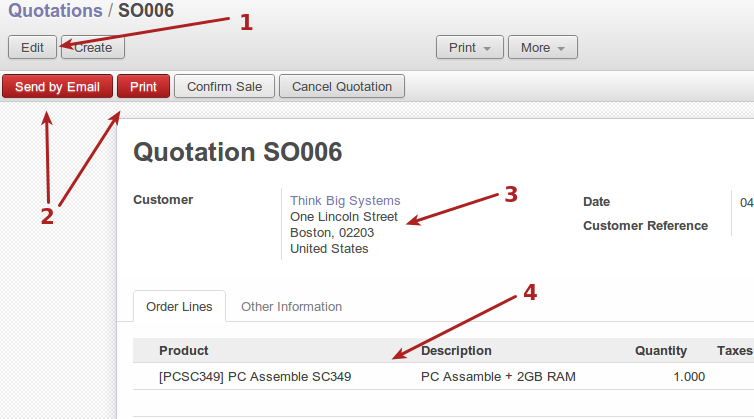
- Edit quote, to add products or change quantities etc.
- Send the quote by email to the customer, or print the quote
- Quote details, including customer
- Quote product details, including prices and quantities
The following screenshot shows the display of a quotation being edited.

- Quotation number, which is system generated.
- Product added to quote
- Button to add more products to the quote
- Quantity and prices of quoted product
- Quote total, including update link to update the total after quote changes have been made
- Terms and conditions for this quotation
The following screenshot displays the state buttons to confirm a quotation into a sales order
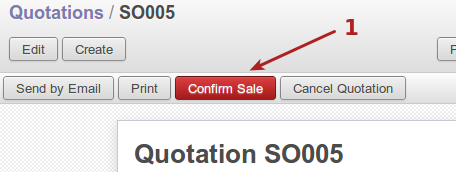
- Confirm the quote into a sale and move it to a sales order
Sales orders
Sales orders are confirmed sales which can be invoiced.
The following screenshot displays the interface for sales orders list view, which can be clicked on to open it for more details.

- Sales order info, including sales order number which is system generated, sales person, total amount etc.
The following screenshot displays the interface for an open sales order, certain parts of the sales order may be edited here, and the sales order may be invoiced here.
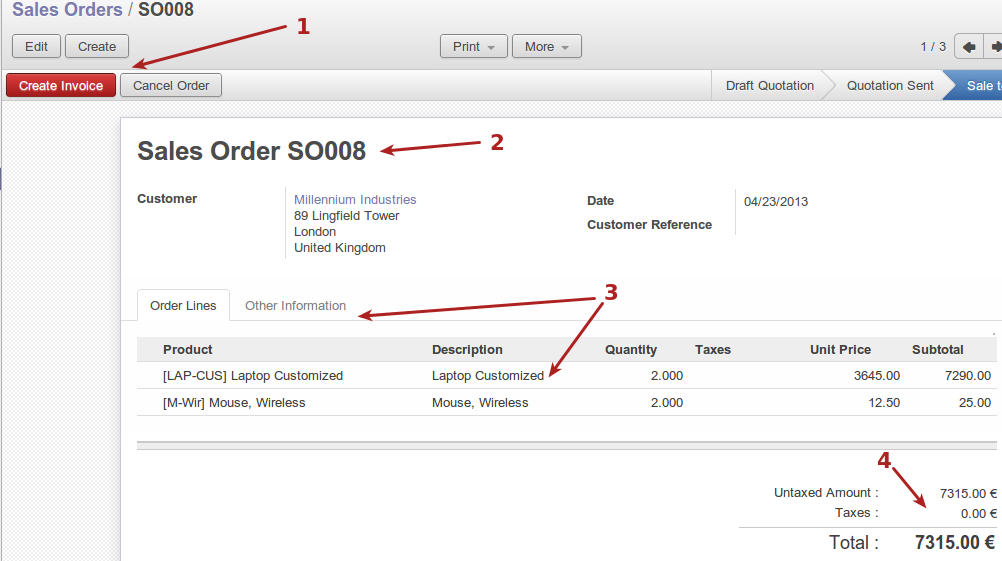
- Create invoice button to invoice the sales order
- Sales order customer details
- Sales order product and sales info
- Sales order total details
The following screenshot displays the interface for invoice generation, once the create invoice button has been clicked.
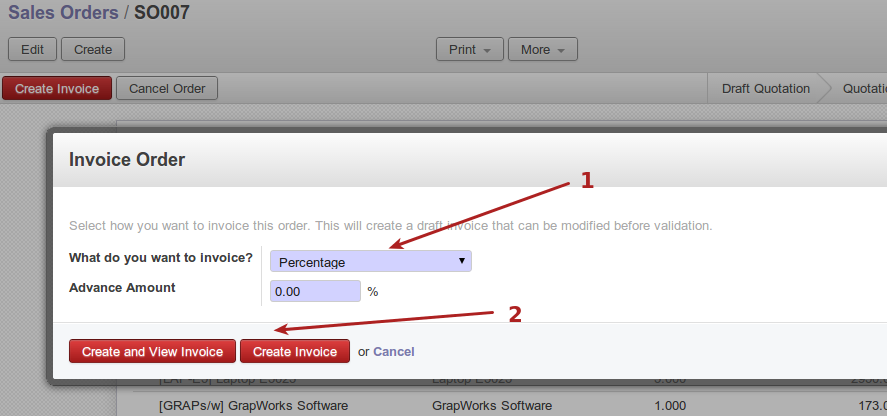
- Different choices of invoicing can be chosen, including invoicing the entire sales order, invoicing a percentage of the invoice etc.
- Create invoice button
The following screenshot displays the sales order listing for an order which which has been draft invoiced. Notice the state change from Sale to invoice, to Sales order.

- Status change after an invoice was generated for the sales order
The following screenshot displays the interface for viewing the invoice once it has been generated.
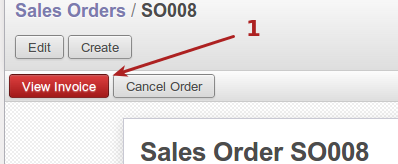
- View invoice button
The following screenshot displays the validate invoice step to validate a generated invoice
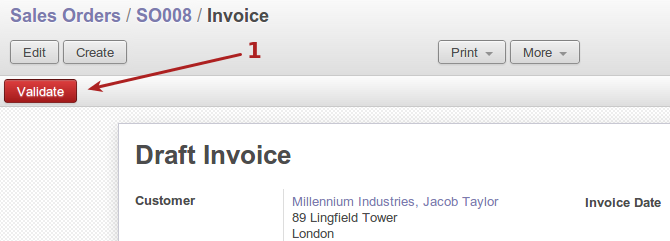
- Validate a generated invoice
The following screenshot displays a validated invoice, ready to be printed or emailed to the customer
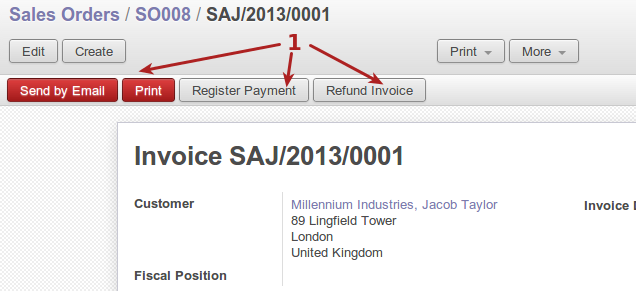
- Send the generated invoice to the customer, register payment or refund invoice
The following screenshot displays the interface to register payment after an invoice was sent to the customer.
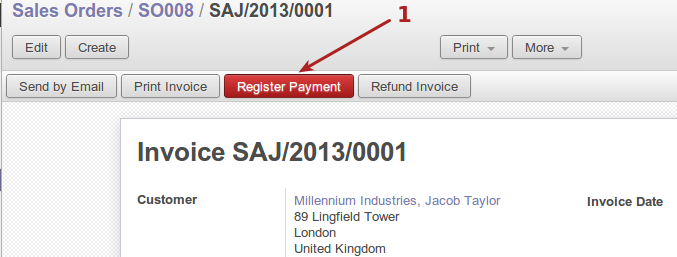
- Register payment button
The following screenshot displays the interface to register a payment on the invoice, with options to select payment method, amount etc.
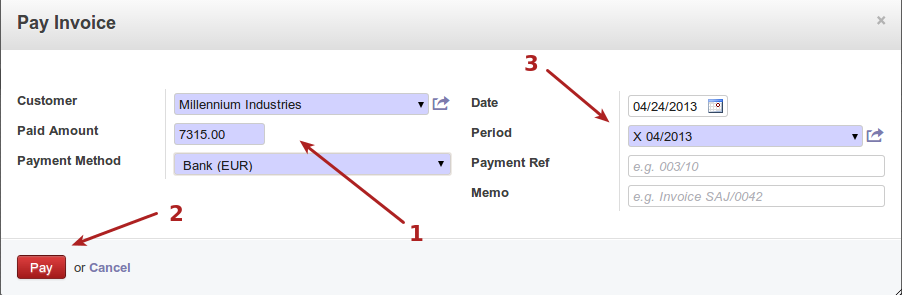
- Invoice payment details, including amount, customer, payment method
- Pay button to register payment received
- Invoice details including date, period, payment reference etc.
The following screenshot displays the interface of the sales order list view after an invoice has been validated and payment has been recorded on the invoice

- Status changed to done for the sales order after the full process
Phone calls
This section allows users to record incoming calls from customers, as well as schedule calls to be made to customers. Calls can be converted to opportunities, meetings can be scheduled from calls, and call backs can be scheduled from incoming calls as well.
The following screenshot displays the interface to log incoming phone calls which can be converted to opportunities.

- Create a logged incoming phone call
- Call summary
- Person responsible for the call
- Schedule another outgoing call for this one
- Schedule a meeting for this call
- Convert this incoming call to an opportunity
This screenshot displays the interface for scheduled outgoing phone calls

- Create a scheduled outgoing call to make
- Summary of call to make
- Schedule a meeting for this call
- Convert this call to an opportunity
- Number to be called
- Person responsible for the call
- Status of the call, whether it has been done, or confirmed etc
- Confirm the call
- Mark the call as having been held
- Cancel the scheduled call
The following screenshot displays an opened scheduled call interface
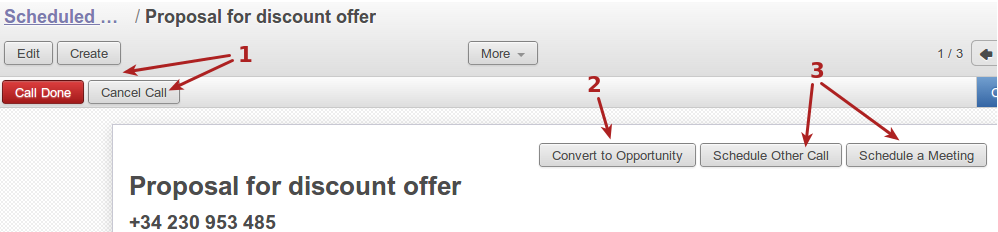
- Mark call as done, or cancelled respectively
- Convert call to an opportunity
- Schedule another call or meeting respectively, for this call
Products
Products include the items and services the company sells, and includes all details around them, costs, quantity etc.
The following screenshot displays the products list interface, along with the create products button to create new products
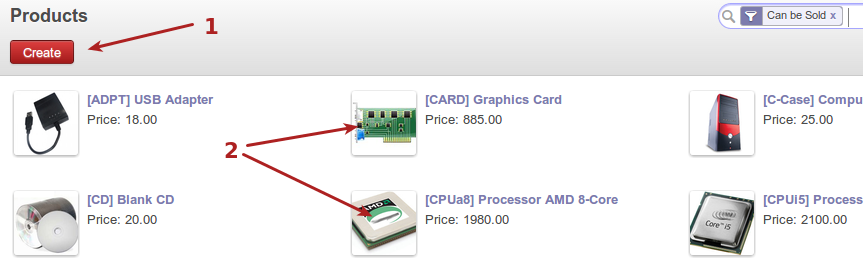
- Create a new product
- Currently listed products, including a graphic and info about them
The following screenshot displays the interface to create a new product
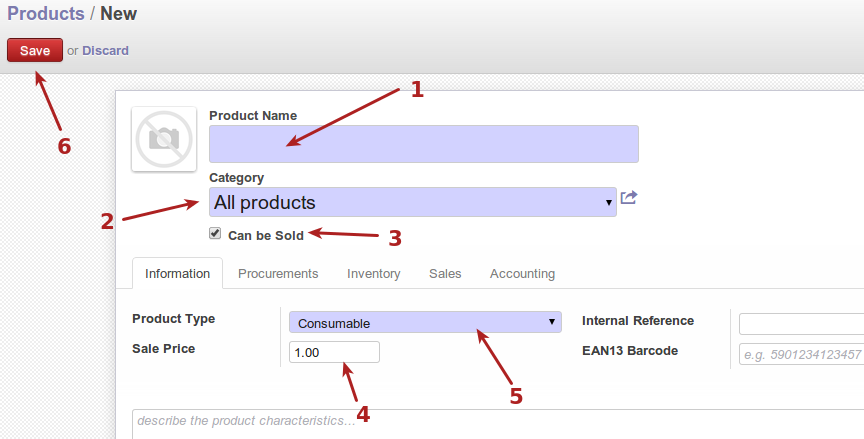
- Product name
- Category of product. Categories are just a way of organizing products, and may include parent - child categories to form a hierarchy
- Check box marking the product as can be sold
- Sale price of product
- Product type, default are consumable and services.
- Save new product
The following screenshot displays the procurement info for this product.
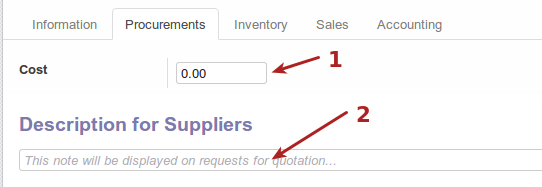
- Cost of product procurement
- Descriptions for procurement to suppliers
The following screenshot displays the sale information for this product
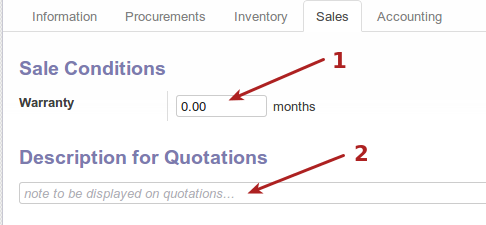
- Product warranty
The following screenshot displays the accounting information for this product

- Listed customer taxes for the product
- Listed supplied taxes for the product
Sales teams
Sales staff can be organized into sales teams. Customers and contacts can be assigned under sales teams etc. Stages of opportunities can be adjusted per sales teams as well.
The following screenshot displays the sales teams view
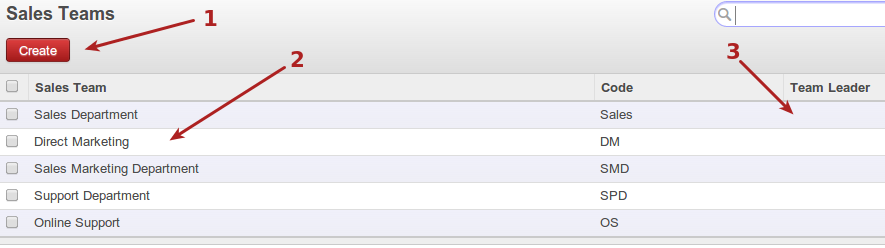
- Create a new sales team
- Name of current sales teams
- Team leader can be assigned per sales team
The following screenshot displays the interface for creating a new sales team
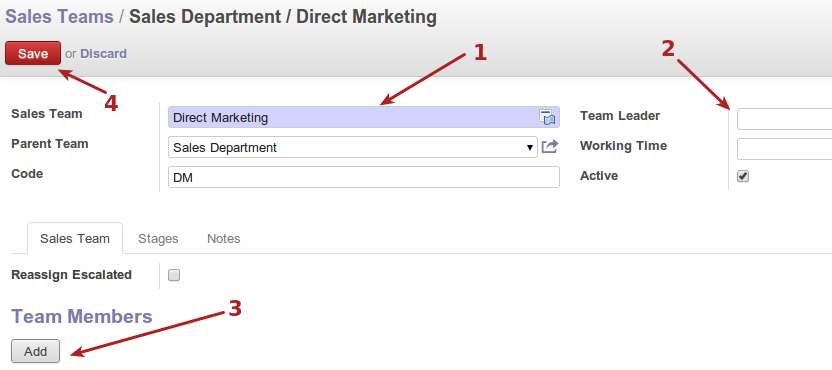
- Details about the new sales team, including name, code etc
- Team lead and working time info for sales team, among others
- Add button to add users to the sales team
- Save button to save new sales team